Welcome to showoff.io
BEST WAYS TO SHARE YOUR LOCALHOST
With the need to share things at a faster rate than before, people have sought ways in which they can make their sites available in a few simple steps. This strategy works exceptionally well for developers looking to get feedback on early stages of development. There are many services which you can rely on when it comes to sharing your localhost. Here are some of the best in the industry.
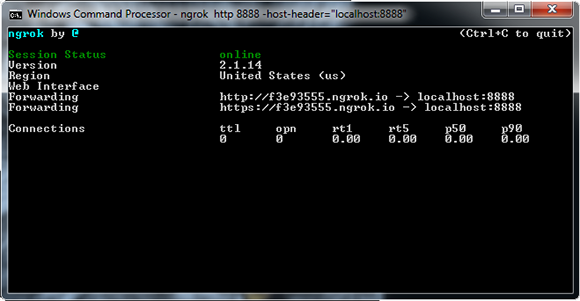
ngrok
When delving into the workings of ngrok, it is essential to look at what comprises open source technology which is an aspect to which many developers relate. In this kind of system, one develops software which users are free to read and modify, and ngrok is the result of such advancements, thanks to Github. It allows you to make your site accessible to the public and it gives you control as to who can view what you have as well as letting you go through details of the hits you have received.
You can use this system even in a situation where you are short on cash as it offers you multiple services even while running the free version. In it, you get to have a subdomain which people can use to access your site. You can also create passwords if you wish to protect your data from access by unwanted parties. Another thing from which you can benefit is the creation of a subdomain to which you would have rights. To get access to this, however, you need to upgrade to the premium services. One last thing that you will enjoy about this service is that you only need to install one app and the work is done, unlike other systems which call for other files for you to get started.
Using it
The process is quite easy, and all you require doing is to access https://ngrok.com/, from where you will come across files which can run on Windows, Mac OS X, and Linux-based operating systems. Running the command: . /ngrok 80 will have you set up your localhost on port 80 and you will get a randomly generated URL which people can use to access your site. And just like that, you can share information online, provided that your users have a stable internet connection.
Forward
![]() This fantastic system works via Ruby, and it can run on Mac, Windows and Linux-based operating systems. Its focus is more on showing the progress of work done and is thus an excellent system for developers who wish to show off how far along they are with their developments. You can opt to start with the free trial which lasts a month. In it, you can protect your data by way of passwords as you quickly get to share your progress. If you do decide to go premium, there are many options suited for various needs such as large organizations, small businesses, and individuals. As such, you get to choose what makes financial sense to you. You also don’t have to adjust your server setup which is a huge plus.
This fantastic system works via Ruby, and it can run on Mac, Windows and Linux-based operating systems. Its focus is more on showing the progress of work done and is thus an excellent system for developers who wish to show off how far along they are with their developments. You can opt to start with the free trial which lasts a month. In it, you can protect your data by way of passwords as you quickly get to share your progress. If you do decide to go premium, there are many options suited for various needs such as large organizations, small businesses, and individuals. As such, you get to choose what makes financial sense to you. You also don’t have to adjust your server setup which is a huge plus.
Using it
Given that it runs on Ruby, it is vital that you start off by getting Ruby and RubyGems installed in your machine before going any further. You can then up for an account at https://forwardhq.com/, where you provide the URL you would like to use. Install the Forward gem and run the following command to get your localhost on port 80: forward 80
People use port forwarding for

Setting up servers
Do you wish to set up Minecraft servers at home or other servers in this category? With port forwarding, it is possible to do so. Another advantage of this system is that you can also use it to optimize your router as well as to test ports on your network.
Speed
Are you tired of spending unending hours on torrent waiting for your download to complete? Well, there is a simple way to fasten your download speeds, and it is as easy as using a VPN. Not only do you get your movies and books at fast rates but you also get to hide your identity in the process, thus keeping you safe if such downloads are illegal in your region.
LocalHost
 If you wish to skip the downloading process entirely, then this is the best app for you. All you require doing is to go to http://localhost.run/, run your application on port 8080 and run the following command: ssh -R 80:localhost:8080 ssh.localhost.run. After this, you can go ahead and share your URL. In this way, you can share your progress with interested parties, and you can get feedback to help you get to the next stages. It also allows you to test your application across many devices with ease. The system works with any SSH application sourced from Linux, Windows or Mac operating systems and is entirely free of charge.
Thanks to the emergence of these systems, developers now have it easy when it comes to sharing their applications, and it has positively impacted the time taken to get new apps into the market.
ADVANTAGES OF CLOUD HOSTING
Scalability is the feature that most differentiates cloud-based hosting and local hosting. You see, you can have your media players located anywhere across the globe yet still have the ability to run on a centralized network as long as you have a stable connection to the internet. As such, the time and money required to set up such hosting decreases significantly. These systems run using a subscription plan such that users are subject to a given monthly fee to enjoy the services rendered. In this way, providers can reduce significantly on the start-up costs, making their services more accessible to people. What’s more, you get to choose what you pay for and can thus further reduce your costs.
Cloud hosting services are preferred by many gaming platforms and online businesses in general - from websites for free games to betting operators. Scalability and reliability are key factors when it comes to customers' satisfaction and it is no wonder that many csgo betting sites are using cloud hosting services for their platforms or some kind of hybrid (cloud/VPS/dedicated) solution.
Installation
Showoff is installed via the gem package system. Gem is available by default with Mac OS X and is also available for many other platforms. To install Showoff using gem, run the following command:
On Windows
You may need to download and install Ruby before you can install Showoff.
Once Ruby is installed, make sure the bin folder is added to your system path. For example, if Ruby was installed into C:\Ruby192, do this:
- Open the Control Panel.
- Find
System > Advanced > Environment Variables. - Edit the
PATHentry. - Append
;C:\Ruby192\binto the value.
Verify Ruby is on your PATH by opening a command prompt and running ruby --version.
Follow the link to find out how to use Showoff and other support.


